
Unity Localization 連携

Unity Localization 連携
Localization シリーズ (1 / 3)
- Unity Localization 連携
- Unity Localizationをより効率的に使ってみる
- Unity Localization - Smart Strings 활용 방법

目次
- 1. Localization の導入
- 2. Localization 環境設定
- 3. Google Sheets 連携
- 4. UGUI での使い方
- 5. Asset Table 設定方法
- 6. Localization カスタマイズ
Localization 連携と使用方法
- Localization (ローカライズ) はゲーム運用で必須要素。TextMeshPro と String Event を組み合わせることで、UI テキストを選択言語に応じて切り替えられる。
1. Localization の導入
- Package Manager から Localization をインストールする。
2. Localization 環境設定
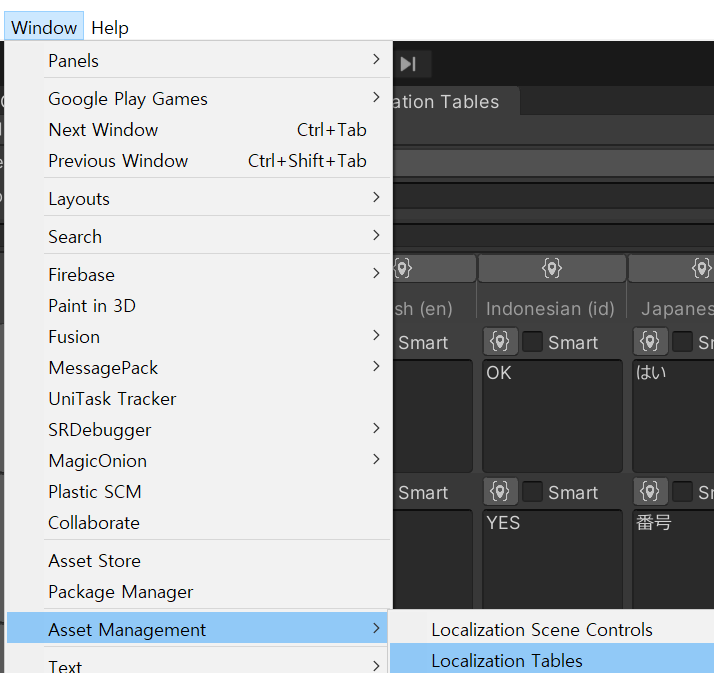
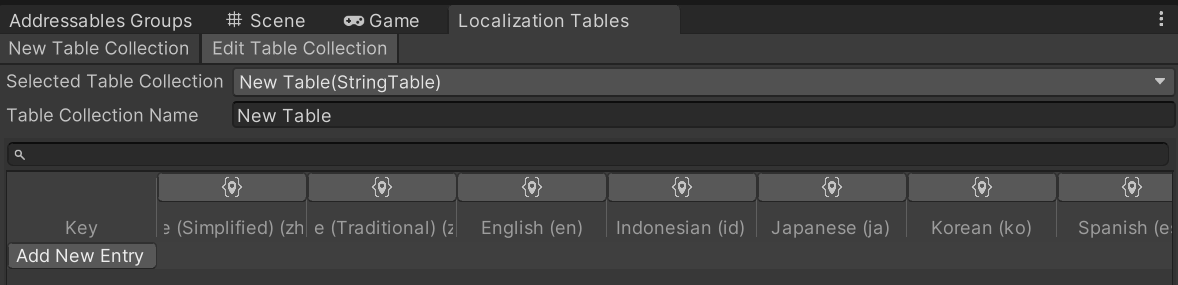
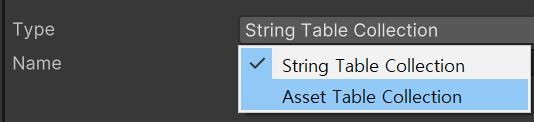
Window - Asset Management - Localization Tablesで String Table / Asset Table を作成・管理できる。
- 上部タブの
NewTableCollectionは新規作成、EditTableCollectionは編集。
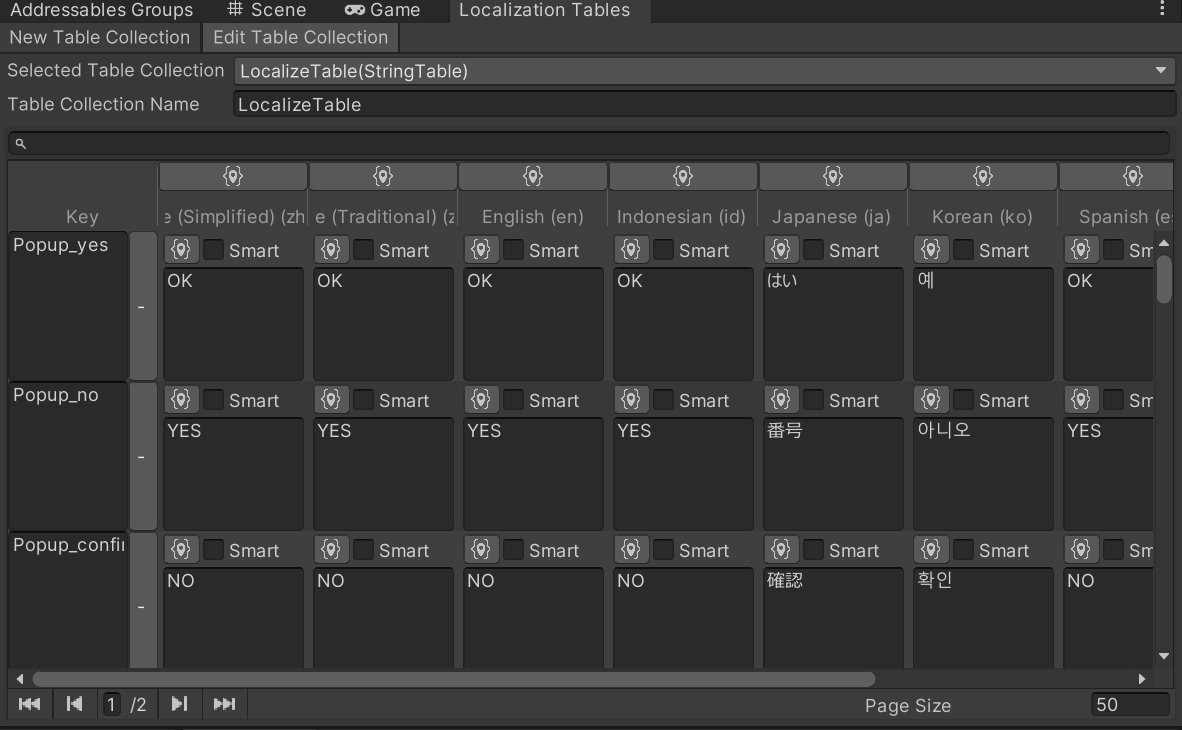
- String Table は string key を参照して locale ごとの翻訳を持つテーブル。
Asset Table は Font / Font Material などを locale ごとに割り当てるテーブル。
- Edit Table モードで
Add New Entryを押すと行を追加できる。

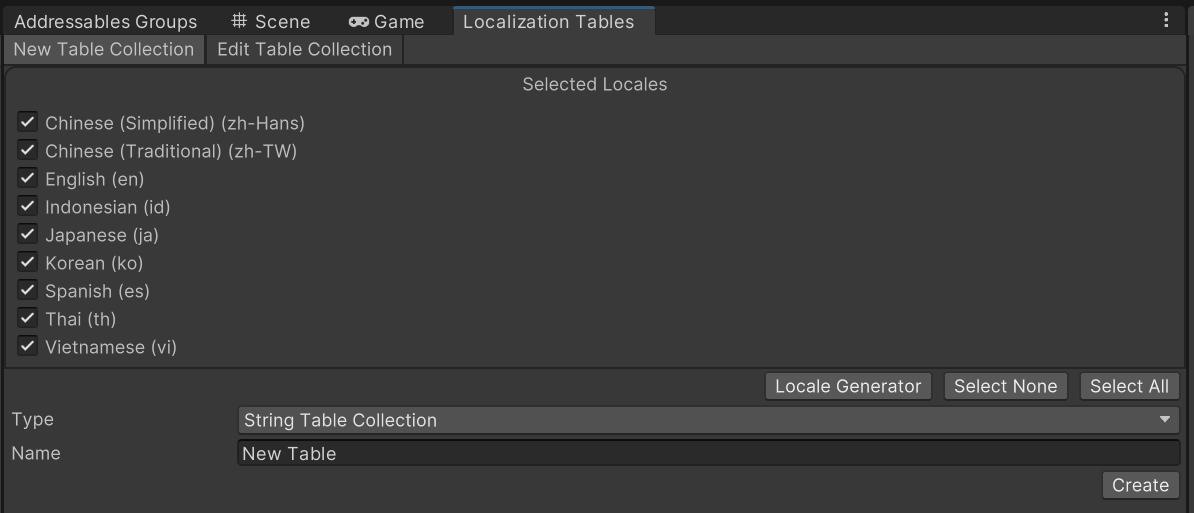
Locale Generatorで言語を追加でき、各国言語には固有 locale code がある。
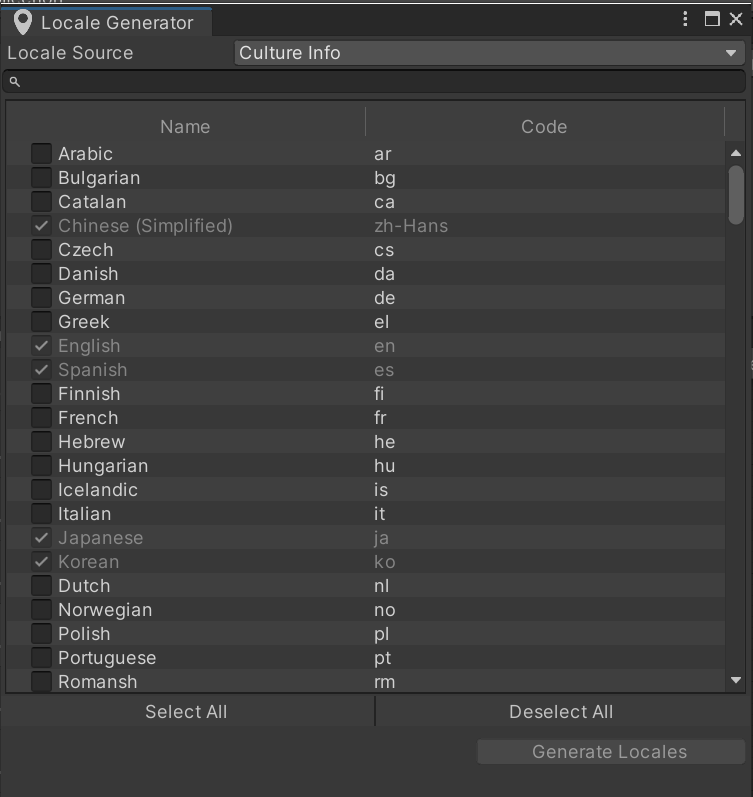
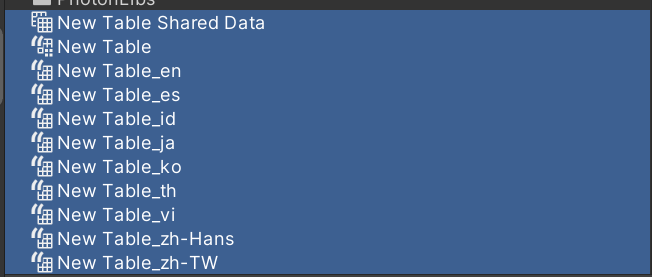
Createを押すとテーブル生成先フォルダを指定できる。- 指定フォルダに Table / Table Shared Data / Locale テーブルが生成される。

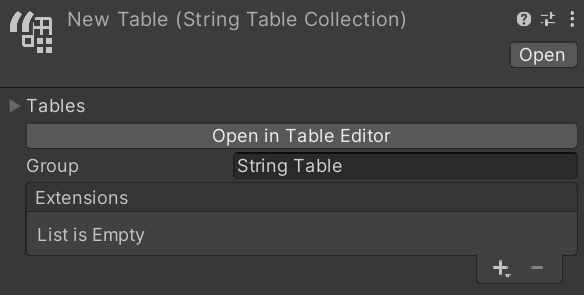
- String Collection Table を見ると、
- Extensions に CSV と Google Sheets を登録できる。
- ここでは Google Sheets 連携を扱う。

3. Google Sheets 連携
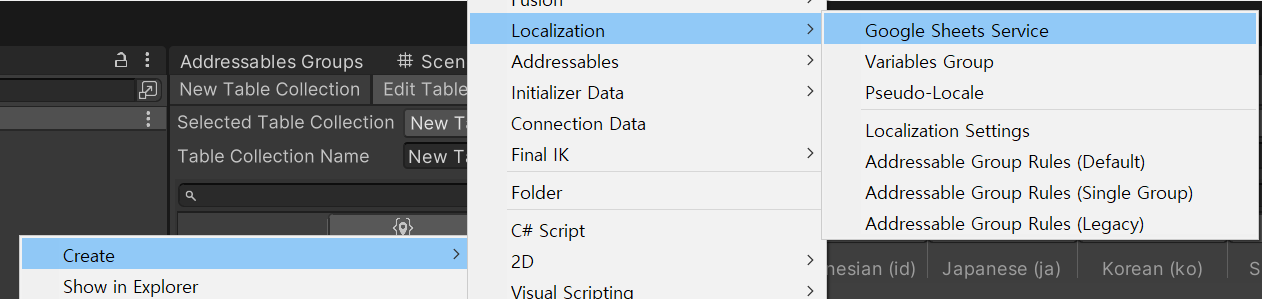
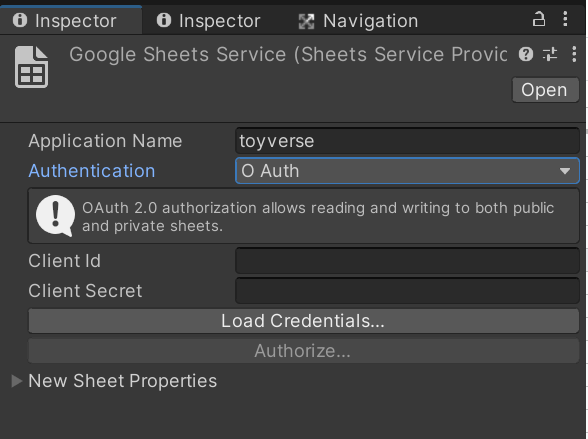
- Project タブで
Create - Localization - Google Sheet Serviceを作成。
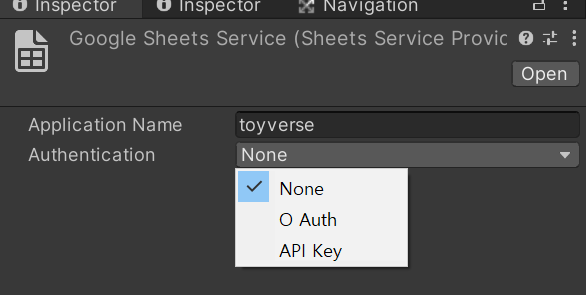
- Inspector で Authentication 権限設定を確認できる。
- Google Cloud Service 経由で OAuth か API Key を選択する (私は OAuth を使用)。
OAuth 権限登録方法
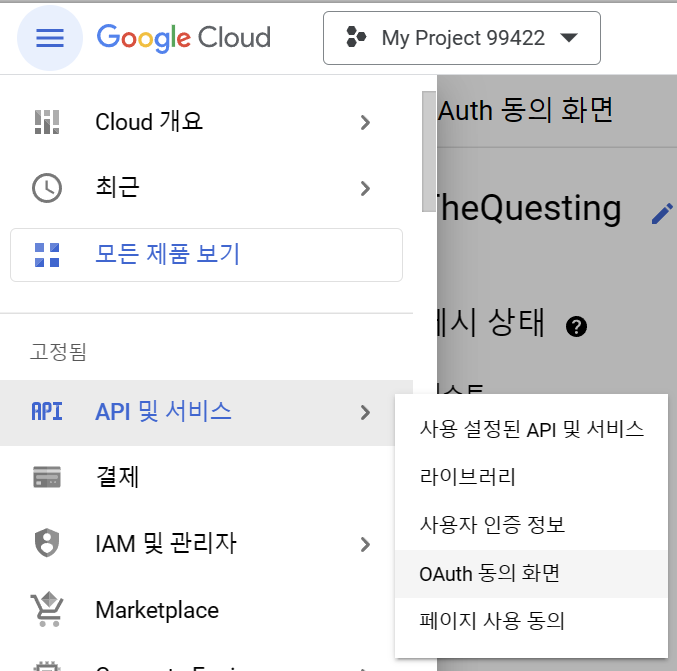
- Google Cloud Console にアクセス。
- Google Cloud の登録/同意を進める。
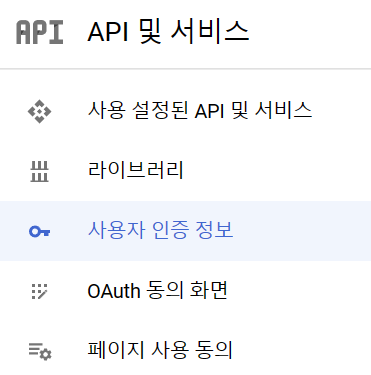
- メニュー
API とサービス - OAuth 同意画面を開く。
- プロジェクト名横の
アプリを編集を押す。
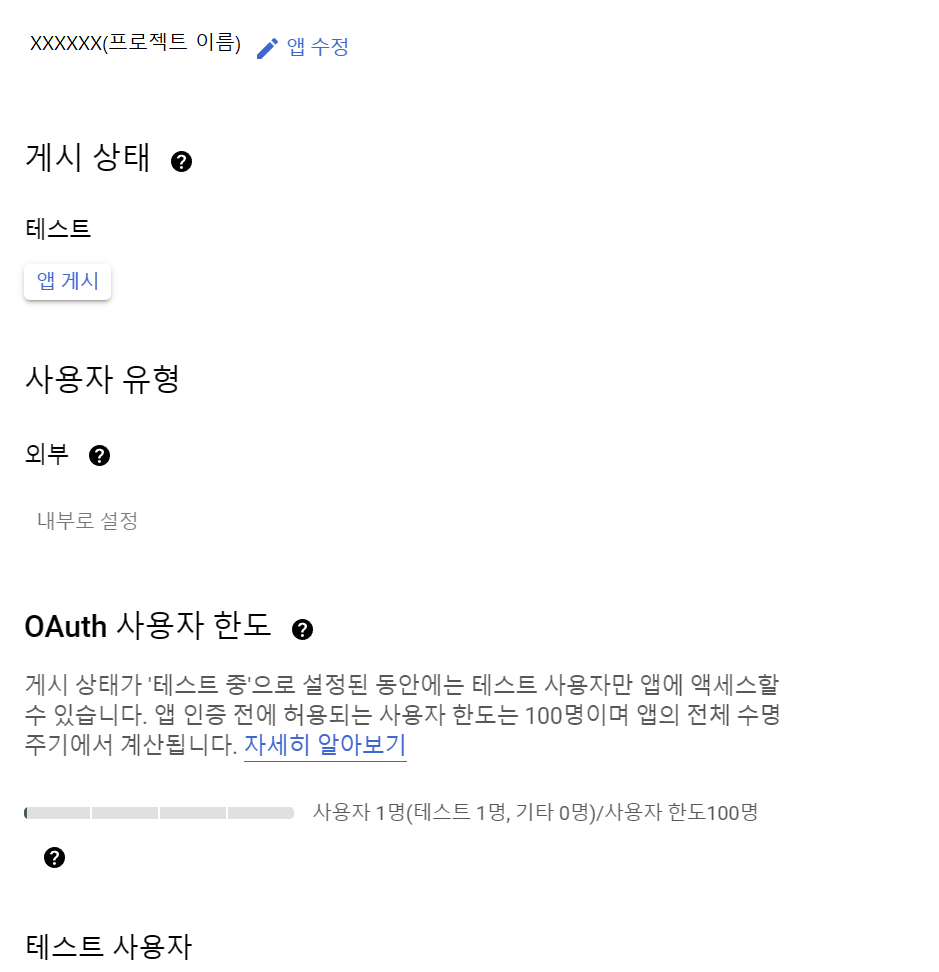
- アプリ名とサポートメールを設定。
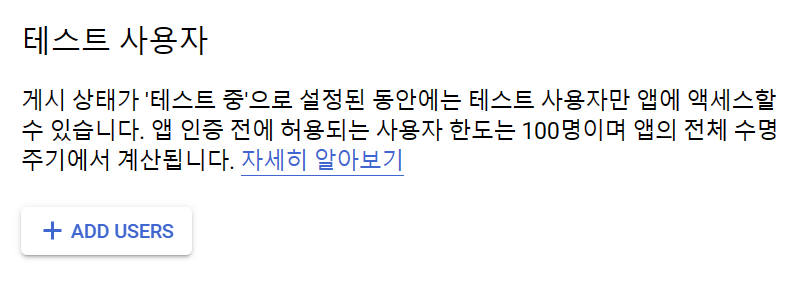
- テストユーザー項目まで進む。
+ ADD USERSでテストユーザー登録が必要 (Google Sheets アクセス権付与のため)。

- ここまで完了したら
認証情報タブへ移動。
- OAuth Client ID / Secret が生成されていることを確認。
- クライアント名をクリック。

- 最終的に client ID と secret を確認できる。

- Unity に戻り、先ほど作成した Google Sheet Service の Authentication を OAuth に設定。
- 取得した Client ID / Secret を入力し、
Authorize...でブラウザ認証を行う。
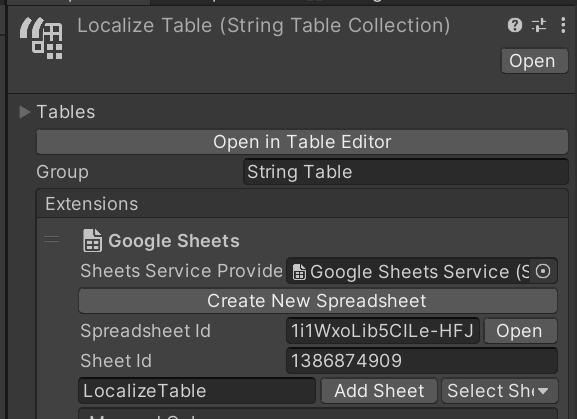
- Localize Table (String Table Collection) の Inspector で Extensions に Google Sheets Extension を追加。
- 上で作成した Google Sheet Service Provider を登録する。
Create New SpreadSheetで Drive に新規 Spreadsheet を作成可能。- 既存 Spreadsheet は Spreadsheet ID / Sheet ID を入力して連携可能。
注意点
- Google Sheets API を有効化する。
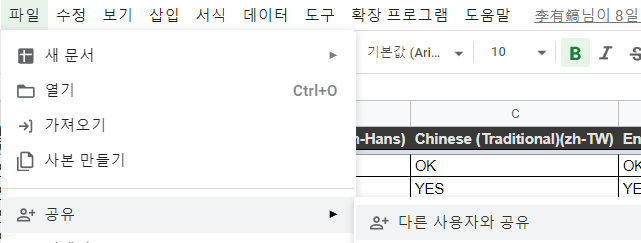
- 連携する Spreadsheet の共有設定を公開 or ユーザー追加にする。
- これを満たさないと Unity 上で Localization Push/Pull は動作しない。

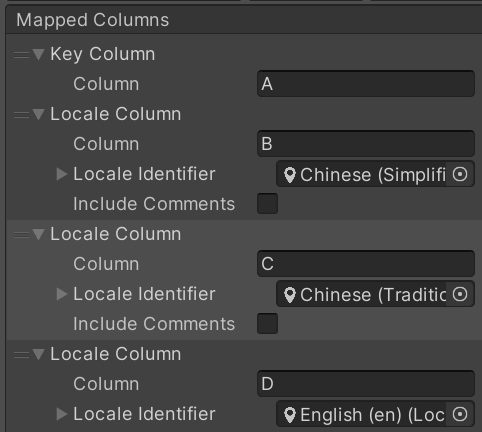
- 連携した Google Spreadsheet を取り込む前に、
- 列マッピングを先に設定する。
- Key 列 + 各言語 locale 列を必要数追加する。
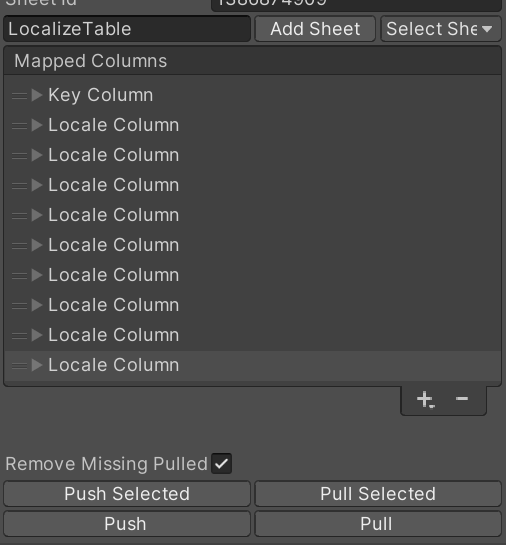
- 列/locale 列を追加した状態:
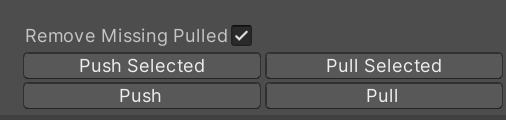
- マッピング完了後に
Pullを押すと Spreadsheet 情報を取得できる。Push は非推奨。誰が Push したかの履歴が残りにくく、Push/Pull 競合も起きやすい。
実務では Spreadsheet 側を編集し、Pull だけでクライアント同期する運用が安定。 - Unity Editor 側で直接 Table を編集するのも基本非推奨。
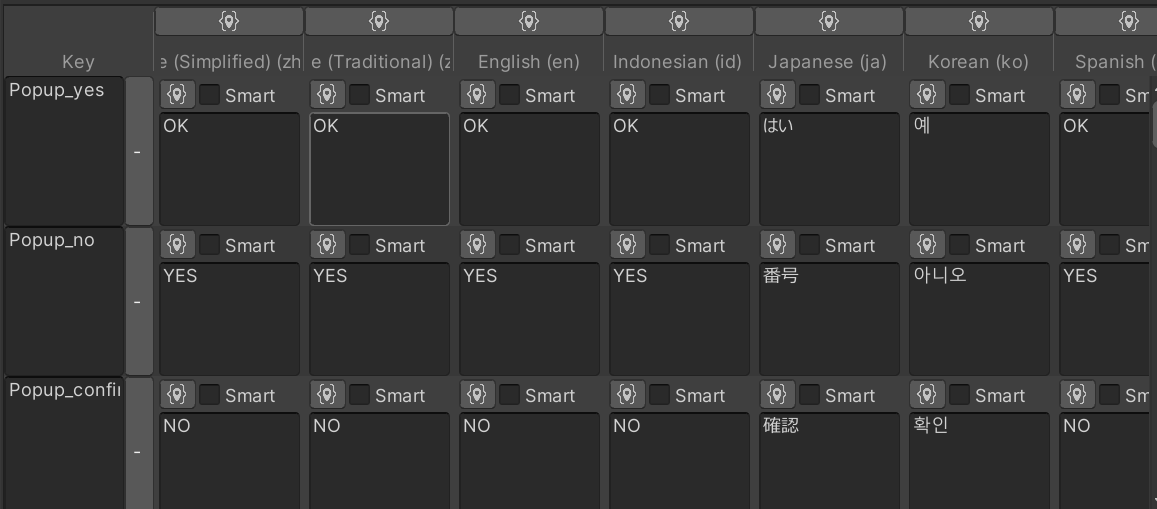
- Google Spreadsheet 側 Localization Table 例

- Unity Editor Table Collection 側表示
4. Localization を UGUI で使う方法
必須条件
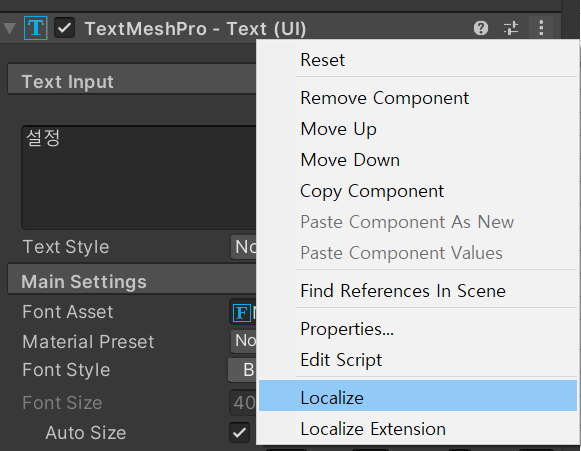
- UGUI テキストは
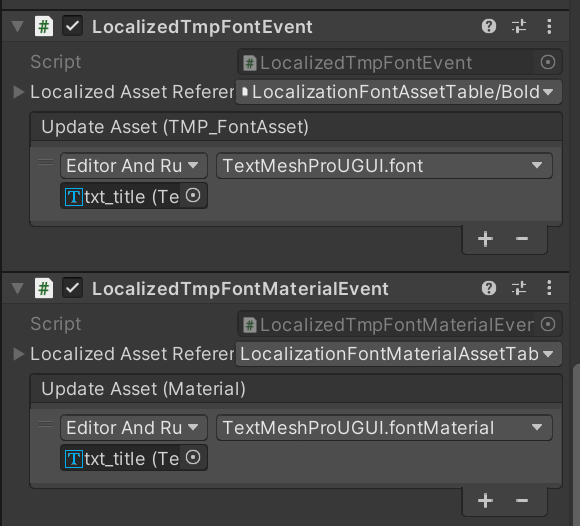
TextMeshPro - Text (UI)であること。 Localize String Eventコンポーネントが対象オブジェクトに付与されていること。- font material / font も切り替える場合は以下のようなクラスを作って使う。
1
2
3
4
5
6
7
8
9
10
11
12
13
14
15
using System;
using TMPro;
using UnityEngine;
using UnityEngine.Events;
using UnityEngine.Localization;
using UnityEngine.Localization.Components;

namespace Base
{
    [AddComponentMenu("Localization/Asset/" + nameof(LocalizedTmpFontEvent))]
    public class LocalizedTmpFontEvent : LocalizedAssetEvent<TMP_FontAsset, LocalizedTmpFont, UnityEventTmpFont> {}

    [Serializable]
    public class UnityEventTmpFont : UnityEvent<TMP_FontAsset> {}
}
1
2
3
4
5
6
7
8
9
10
11
12
13
14
15
16
17
18
19
20
21
22
23
24
25
26
27
28
29
30
31
32
33
34
35
36
37
38
39
40
41
42
using System;
using TMPro;
using UnityEngine;
using UnityEngine.Events;
using UnityEngine.Localization;
using UnityEngine.Localization.Components;
using Cysharp.Threading.Tasks;

namespace Base
{
    [AddComponentMenu("Localization/Asset/" + nameof(LocalizedTmpFontMaterialEvent))]
    public class LocalizedTmpFontMaterialEvent : LocalizedAssetEvent<Material, LocalizedMaterial, UnityEventTmpFontMaterial>
    {
        private TextMeshProUGUI _targetText;

        private void Start()
        {
            _targetText = GetComponent<TextMeshProUGUI>();
        }

        protected override async void UpdateAsset(Material localizedAsset)
        {
            if (_targetText == null)
            {
                _targetText = GetComponent<TextMeshProUGUI>();
            }

            if (_targetText != null)
            {
                await UniTask.WaitUntil(() => localizedAsset);
                _targetText.fontMaterial = localizedAsset;
            }
            else
            {
                Debug.LogError("[ LocalizedTmpFontMaterialEvent / UpdateAsset ] TextMeshPro is null");
            }
        }
    }

    [Serializable]
    public class UnityEventTmpFontMaterial : UnityEvent<Material> {}
}
Component として使う方法
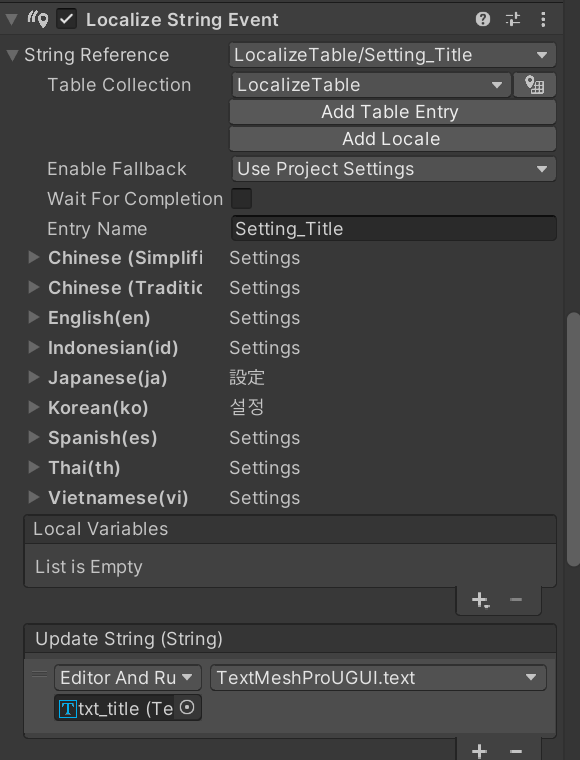
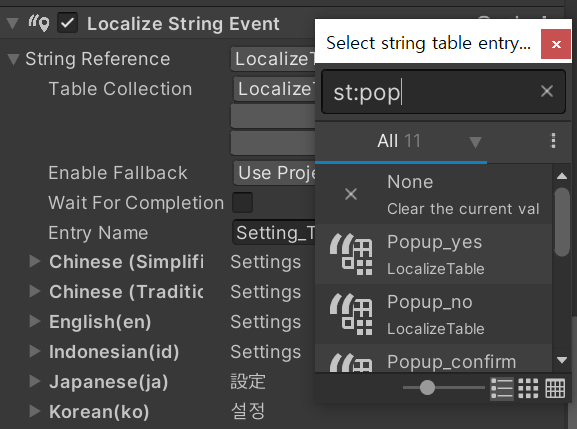
Localize String Eventを追加。
- String Reference から table key を検索して割り当てる。
- Table Collection も自動割り当てされる。
- locale 切替時にどの文字列が入るか表示され、更新対象 TMP text も指定できる。
- font / font material も切り替えたい場合は、
- Add Component または Localize Extension で追加する。
1
2
3
4
5
6
7
8
9
10
11
12
13
14
15
16
17
18
19
20
21
22
23
24
25
26
27
28
29
30
31
32
33
34
35
36
37
38
39
40
41
42
43
44
45
46
47
48
49
50
51
52
53
54
55
using System;
using Base;
using TMPro;
using UnityEditor;
using UnityEditor.Events;
using UnityEngine;
using UnityEngine.Events;
using UnityEngine.Localization.Components;

static class TMProLocalizeExtension
{
    [MenuItem("CONTEXT/TextMeshProUGUI/Localize Extension")]
    static void LocalizeTMProTextWithFontAssets(MenuCommand command)
    {
        var target = command.context as TextMeshProUGUI;
        SetupForLocalizeString(target);
        SetupForLocalizeTmpFont(target);
        SetupForLocalizeTmpFontMaterial(target);
    }

    static void SetupForLocalizeString(TextMeshProUGUI target)
    {
        var comp = Undo.AddComponent(target.gameObject, typeof(LocalizeStringEvent)) as LocalizeStringEvent;
        comp.SetTable("LocalizeTable");
        var setStringMethod = target.GetType().GetProperty("text").GetSetMethod();
        var methodDelegate =
            Delegate.CreateDelegate(typeof(UnityAction<string>), target, setStringMethod) as UnityAction<string>;
        UnityEventTools.AddPersistentListener(comp.OnUpdateString, methodDelegate);
        comp.OnUpdateString.SetPersistentListenerState(0, UnityEventCallState.EditorAndRuntime);
    }

    static void SetupForLocalizeTmpFont(TextMeshProUGUI target)
    {
        var comp = Undo.AddComponent(target.gameObject, typeof(LocalizedTmpFontEvent)) as LocalizedTmpFontEvent;
        var setStringMethod = target.GetType().GetProperty("font").GetSetMethod();
        var methodDelegate =
            Delegate.CreateDelegate(typeof(UnityAction<TMP_FontAsset>), target, setStringMethod) as
                UnityAction<TMP_FontAsset>;

        UnityEventTools.AddPersistentListener(comp.OnUpdateAsset, methodDelegate);
        comp.OnUpdateAsset.SetPersistentListenerState(0, UnityEventCallState.EditorAndRuntime);
    }

    static void SetupForLocalizeTmpFontMaterial(TextMeshProUGUI target)
    {
        var comp = Undo.AddComponent(target.gameObject, typeof(LocalizedTmpFontMaterialEvent)) as LocalizedTmpFontMaterialEvent;
        var setStringMethod = target.GetType().GetProperty("fontMaterial").GetSetMethod();
        var methodDelegate =
            Delegate.CreateDelegate(typeof(UnityAction<Material>), target, setStringMethod) as
                UnityAction<Material>;

        UnityEventTools.AddPersistentListener(comp.OnUpdateAsset, methodDelegate);
        comp.OnUpdateAsset.SetPersistentListenerState(0, UnityEventCallState.EditorAndRuntime);
    }
}
- エディタ/ゲーム内で言語変更すると UGUI テキストは自動更新される。
Script で使う方法
- UGUI が動的生成される場合、Inspector 直設定ではなくスクリプト呼び出しで処理できる。
- 下画像のように Update String を割り当てればよい。

Script 例


LocalizeStringEventをGetComponentし、SetEntry(key)を呼ぶ。- Table Collection の key を参照し、現在 locale に合わせて TMP text へ適用される。
さらに、動的な内部データ文字列の差し込み
- balance や username のような動的値は、
- key で Smart を有効化し、テーブル側で
{}引数名を入れ、コード側でSetEntry前に Arguments を設定する。
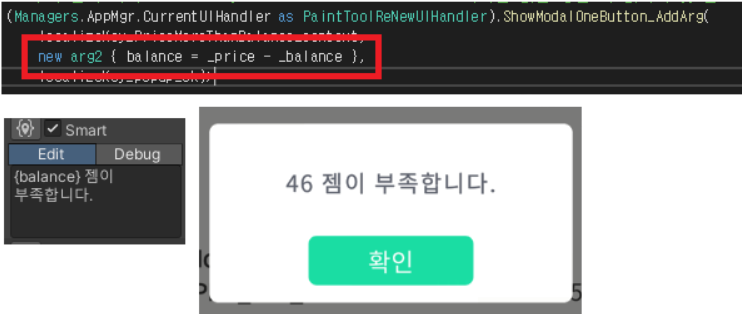

- CommonModal での使用例
例コード
1
2
3
4
5
6
7
8
9
10
11
12
13
14
15
16
17
18
19
20
21
22
23
24
25
26
27
28
29
30
31
32
33
34
35
36
37
38
39
40
41
42
43
44
45
46
47
48
49
50
51
52
53
54
55
56
57
58
59
60
61
62
63
64
65
66
67
68
69
70
71
72
73
74
75
76
77
78
79
80
81
82
83
84
using System;
using System.Collections;
using TMPro;
using UniRx;
using UnityEngine;
using UnityEngine.Localization.Components;
using UnityEngine.UI;

public struct CommonModalContents
{
	public readonly string _titleTextKey;
	public readonly string _contentsTextKey;
	public readonly string _buttonTextKey;
	public readonly Action _buttonAction;
	public LocalizeArgBase _arg;

	public CommonModalContents(string contentsTextKey_, string buttonTextKey_, Action buttonAction_, string titleTextKey_ = "타이틀")
	{
		_titleTextKey = titleTextKey_;
		_contentsTextKey = contentsTextKey_;
		_buttonTextKey = buttonTextKey_;
		_buttonAction = buttonAction_;
		_arg = new LocalizeArgBase();

	}

	public CommonModalContents(string contentsTextKey_, LocalizeArgBase arg_, string buttonTextKey_, Action buttonAction_, string titleTextKey_ = "타이틀")
	{
		_titleTextKey = titleTextKey_;
		_contentsTextKey = contentsTextKey_;
		_buttonTextKey = buttonTextKey_;
		_buttonAction = buttonAction_;
		_arg = arg_;
	}

}
[Serializable]
public class LocalizeArgBase { };
public class LocalizeArg_PurchaseBalance : LocalizeArgBase
{
	public int balance;
}


public class CommonModal : UIPopup
{
	[SerializeField] private CanvasGroup _canvasGroup;
	[SerializeField] protected TextMeshProUGUI _titleText;
	[SerializeField] protected LocalizeStringEvent _titleTextLocalize;
	[SerializeField] protected TextMeshProUGUI _contentsText;
	[SerializeField] protected LocalizeStringEvent _contentTextLocalize;
	[SerializeField] private LocalizeStringEvent _buttonTextLocalize;
	[SerializeField] private Button _button;
	[SerializeField] private VerticalLayoutGroup _verticalLayoutGroup;

	private void Awake()
	{
		_contentTextLocalize.OnUpdateString.AsObservable().TakeUntilDestroy(this.gameObject).Select(value => value).Subscribe(value =>
		{
			_contentsText.text = _contentsText.text.Replace("\\n", "\n");
			Observable.FromCoroutine(RefreshCoroutine).TakeUntilDestroy(this.gameObject).Subscribe(_ => { }, () => { _canvasGroup.alpha = 1.0f; });
		});
	}

	public void SetCommonModal(CommonModalContents contents_)
	{
        // 어떤 팝업창인지 구분하기 위해 임시로 설정
        _titleText.text = contents_._titleTextKey;
        //_titleTextLocalize.SetEntry(contents_._titleTextKey);
		_contentTextLocalize.StringReference.Arguments = new[] { contents_._arg };
		_contentTextLocalize.SetEntry(contents_._contentsTextKey);
		_contentTextLocalize.RefreshString();
		_buttonTextLocalize.SetEntry(contents_._buttonTextKey);
		AdditionalFunction.SetSafeButtonActionOnlyOneCall(_button, contents_._buttonAction, this.gameObject);
	}

	private IEnumerator RefreshCoroutine()
	{
		Canvas.ForceUpdateCanvases();
		_verticalLayoutGroup.enabled = false;
		yield return null;
		_verticalLayoutGroup.enabled = true;
	}
}
5. Asset Table 設定方法
- New Table Collection では String Table とは別に Asset Table がある。
- Asset Table は locale code ごとに Font / Font Material を切り替えるテーブル。
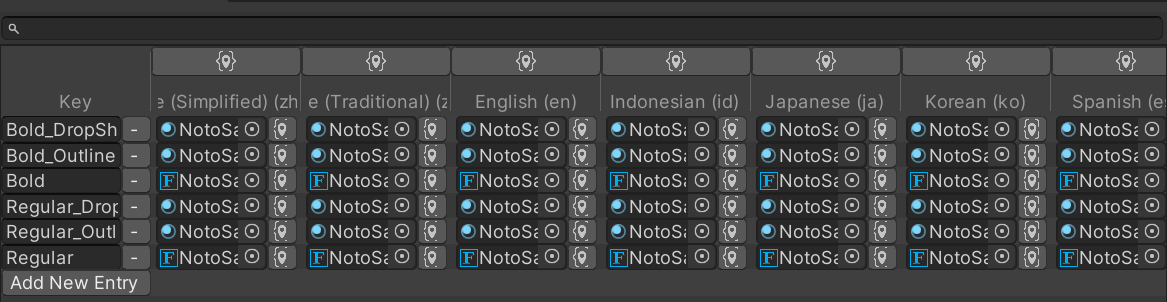
Font Asset Table

- 例として NotoSans を使い、バリエーションを key として登録。
- Regular / Bold など生成した font を locale table に割り当てる。
- 言語変更時に kr/jp/en へ応じて font が切り替わる。
Font Material Asset Table
6. Localization カスタマイズ
- 開発中、Localization 関連でいくつか課題があった。
- 1つ目は言語ごとの文字数差。改行が増えると text サイズ調整が必要になる。
- 2つ目は UI 要件に合わせた色/太字などの個別カスタマイズ。
1つ目は言語ごとに font を分ける手もあるが、font 容量負担が大きくなるため、実務では単一 font 統一が多い。
- 解決策として有効なのが Rich Text。
- Localization table 側に Rich Text 形式を入れるだけで簡単に対応できる。
- ただし TMP はオーバーヘッドと draw call 増加があるため、軽量なテキスト UI での利用を推奨 (フォント/サイズ/色変更用途中心)。
- Unity Rich Text ドキュメント
- 使用例

この記事は著者の CC BY 4.0 ライセンスの下で提供されています。